Monday 22 December 2014

Sewing Caddy

Sewing Caddy 

I started with a small cardboard open box. This was a cardboard insert from a packing box. When I see things like this, I save with the thought that one day it might come in handy. My husband thinks I'm mad, he say's I'm collecting junk, but look I've proven him wrong. I have used this piece of so called junk and turned it into a very useful item in deed.


The base of the sewing caddy is approximately 3.5inchs square. I trimmed down the sides to approx. 1/2inch. I only needed enough on the sides to help keep the shape.


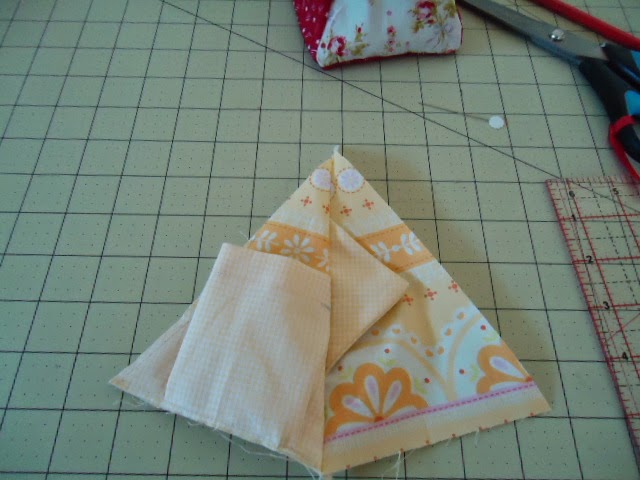
The next step was to make the 4 triangle sides. I had to decide the height on which to make the caddy. The width was 4inch (includes 1/4inch seam allowance) and the height was 51/2inch (this allowed 1/4inch seam allowance on the 2 sides going into a point)
 
Before assembling I added pockets and tabs to the 4 sides. I used a contrasting colour of fabric using the same measurements as the triangle and attached to,  2 of the triangle sides creating a pocket. I used 2 x 3inch squares and folded in half  and stitched then turned to right side to make the 2 smaller triangular tabs.
 Hope you can understand my instructions, please refer to pictures below, I think they are self explanatory.
 
 
I then assembled the triangles together, making sure I attached a triangle with a tab against a triangle with a pocket. So when it's complete the pockets will be opposite & tabs will be opposite each other on the caddy. 
 
 
Hope the pictures below help with explaining what I mean.
 
 
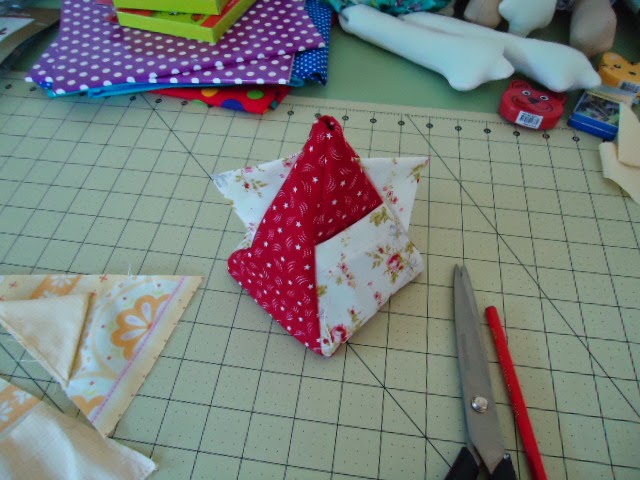
Using a 1/4inch seam allowance to join all 4 triangles together. As you can see from the picture below, the triangles get small at the top, due to going into a point. If you turn this to the right side you will see their is a small hole at the very top. Don't worry you will close this hole with the bead and tassel.
 
 
The next step with the triangles inside out I attached the square base stitching on 3 sides using a 1/4inch seam allowance. Then turn to right side and thread the bead onto the tassel and then thread through the hole at the top of the triangle and secure. Stuff with stuffing until it's 3/4 filled, insert the cardboard base and carefully fill, making sure not to over stuff  and put out of shape. Once stuffed, slip stitch the 4th side of base.


The only thing left is to stitch down the tabs, I used a small bead. 
 
 
I put a tape measure & packet of needles in the 2 pockets. And I put a stitch un-pick & scissors in the tabs. I also added a few pins around the top of the triangle.


The finished project.


Sunday 30 November 2014

A little gift for friends

The little gift I am about to show you, is from earlier this year, when the lovely ladies from our little sewing group got together, up at the lovely tea rooms Harvey's Range. It must have been early July I think just before I started my course. We all got together knowing it was going to be a while before we would meet again, due to all our busy scheduled life's. We had a fantastic time sharing stories of achievements and adventures within each of our busy life's. I decided on the spur of the moment, a couple of days before we were meeting, to make them something just to say thank you for being their as my friend's, and supporting me while I was going through the transition, from being made redundant and starting a new career change.

I decided to make my version of Val Laird's beautiful placemats


I didn't do all the embroidery work, because I only had a couple of days to get them done. As it was I was up late getting them finished. But overall I don't think they turned out too bad, they were made with love for very special ladies. For which I am very thankful and glad to have them in my life.

First was deciding the materials, I was restricted to what I had in the cupboard. My friends will tell you, I don't know who designed what, I don't go for any particular persons material designs, I just go for material patterns that I like. And trying to put colours and patterns together is something I'm very much still learning.
 
All cut out and ready to sew,
 
 
I did the stitcheries first, but forgot to take a picture. I'm only new at this blogging thing, so remembering to take a picture at ever step, is a hit and miss I'm afraid. But hopefully I will get better. As you can see in the picture below I have done the stitching, added a lace frill, this was quicker than embroidering  the frill like Val's.


Next step was to add the pellon and prairie points, these I have not done before, so found it challenging but fun.  


 Overall I don't think they turned out too bad.

My wonderful Girl Friend's
Jenny, Wendy, Barbra, Heather


Saturday 4 October 2014

Fireman Sam Quilt finally finished

 
I know it as been awhile, if you are just checking out my blog for the first time, the start of this project was a few months ago. If you look back on my blog you will see the start of the creation of this project.
Laying out the piece's as I make them. No actual design I tend to make up the design as I go along. I know this is the incorrect way but I don't have a stash of material, so I tend to use what I have to get started then attempt to create a quilt. All the panels with pictures were coloured with pencils and sealed, them I stitched around edges in back stitch, which helped the pictures to stand out.
 
 
trying to add the large fireman Sam 

 
Here I'm adding the white boarders separating the panels 

 
This is the bottom row of panels finished and ready to have the white boarders attached

 
Dining table coming in very handy, trying to visualise the layout of the quilt.
 
 
White boarders added to panels. The worst thing about making up the design as I go, is trying to work out the exact measurements. But I can say it was fun in the making, especially when the quilt started to come together.

 
Here I have added the white boarders and attached the strips together

 
This is where I got stuck and had to sit and just look and try and add the large panel, making it look like it belonged.

 
As you can see I managed to add the large fireman Sam to the quilt top, along with side panels. Getting it centred and the side panels to fit was a feat, it took me ages to work out the measurements. But overall I was quite pleased with the outcome.


The next step was to add the boarders of red dot and black dot. I really think the quilt top came up a treat, even if I do say so my self.
 
 
You can see a blank square block on the first row, this I embroidered Lennon's name and date of birth. Sorry I forgot to take a photo.

 
Next I have the quilt on my sewing machine where I sewed around each block and fireman Sam.


Here I'm just showing the backing material I used. I love the dots, plus I thought it was a good piece of material where any mistakes would not stand out. Especially when I did the free motion quilting.

 
I thought I would show you the extended table top my lovely husband David made me.

 
As you can see, the table top interlocks with the sewing machines table top. Giving me a larger area where the quilt lies flat and easier to mauver along table. He varnished the top so the quilt slides easily.


This is my long arm my lovely husband made me. I am so spoilt, David is always trying to help me with making items to make my sewing easier.
 
 
I quilted all the white area and boarders. This made the coloured panels stand out.


Here I hope you can see a full view of the long arm, it can take a 3metre quilt.


Well I'm very sorry but I forgot to take a photo of the finished quilt. I was in a hurry and had to get it posted off to the UK and didn't realise I'd missed taking the photo. I can tell you I was very pleased with the outcome and Lennon was a very happy little boy, he loved it.